A Console Stereo: Steve’s Legacy Project

We continue to be amazed at the work that our friend and customer from Canada, Steve White, does.

Luckily for us, Steve graciously shares his talents by allowing us to post pictures of his recent projects.

Here’s what Steve said about his console stereo:

If I were to ever to have a legacy, this project would have to be it! Ever since I was 5 years old I’ve wanted a console stereo. 38 years later and I finally have one.

I took 2 old Magnavox cabinets that were originally the same size (both same as the large one) and added to the larger one to accommodate the turntable, and shrunk the other to be a satellite speaker to allow you place it where ever you wanted to in your room to give you the true stereo separation.

I then painted the cabinets Jet black with ice-pearl sparkles. I wanted the tube amplifier to be displayed unlike in older consoles, right next to the turntable, because to me the amp is art! I then completely restored this 1962 Garrard turntable that was reclaimed from an old console, and put the whole thing together.

Here is the result…. Sounds really nice too!

Job well done, Steve!

Round, Cylindrical or Hemispherical: Rubber Feet Dilemma Solved

You need some rubber feet but don’t know what shape to buy? Look no further. Here is the information you need.

Do you want the top of the self-adhesive rubber feet to have a flat surface? You should choose a cylindrical rubber foot. Cylindrical rubber feet are basically shaped like a coin….flat top, and flat bottom.

They are perfect for situations where you need to use them between two flat surfaces. Some suggested uses are for the back of pictures and art hung on the wall; for kitchen and bathroom cabinets to cushion the close; and craft projects like coasters and stained glass projects. We’ve even seen them used to place sheets of glass on tabletops to separate the glass from the surface underneath. Cylindrical rubber feet are available in both clear and black.

Do you want the self-adhesive rubber bumpers to be rounded? Then you need to purchase hemispherical rubber feet. Think of a ball cut into half – rounded on one side; flat where the adhesive attaches to the surface.

Hemispherical rubber feet are perfect for separating electronics equipment to help air circulate between two boxes. They are also ideal for applying to surfaces when you need a little bit of a grip on the surface underneath.

Here’s a unusual use for a hemispherical rubber foot: Apply with the adhesive side down on a bookshelf or display cabinet to hold propped up items in place. Clear rubber feet work perfectly on glass shelves! Like cylindrical feet, hemispherical rubber bumpers are available in clear or black.

Solar Energy in China: Here Comes the Sun

Growing demand for renewable energy sources has skyrocketed all over the world, but no where is this more evident than in China.

Take a look at the city of Rizhao where miles of dark tubing cover the roofs of apartment buildings and private homes. The reason? Using solar powered hot water heaters is mandatory in Rizhao. In fact, due to requirements such as this one, China has become the largest producer (and consumer of) solar hot-water heaters. Rizhao’s commitment to solar energy is deep: it has pledged to become the very first city in China to become carbon-neutral.

The good news for all of us is that the surge in solar panel requirements has created more supply, and thus lower pricing for all of us. The lower prices help make solar energy more affordable even here in the US.

As new panels are shipped to us, we will be passing on the new lowered prices to our customers. West Florida Components has just lowered our prices on all new solar panels by an average of 16%. Good news for all of us!

Rubber Feet – How to Apply Self-Adhesive Rubber Bumpers

Many customers have asked about the best way to apply self-adhesive rubber feet to surfaces so that they are properly applied…and stay on the intended surfaces.

Here are the recommended application instructions:

    • Clean the surface where you will be applying the rubber feet. It should be dry and free of debris, oils and solvents. In addition, the ideal surface for rubber feet application is smooth and non-porous. You can use a mild solvent such as isopropyl alcohol to remove dirt or grease.
    • Grasp the rubber bumper on the sides without touching the adhesive.
    • Press the rubber bumper firmly into place on the application surface. The rubber foot can not be repositioned without effecting the adhesive.
    • For best results, allow 24 hours before exposing the rubber feet to heavy force or weight. This allows the adhesive on the rubber feet enough time to ‘cure’.

Besides following the above instructions when applying the rubber feet, it is important to keep the rubber feet (both storage and use) at a temperature that is between 70° – 80°F (21° – 27°C).


Choosing Batteries for a Solar Energy System

When putting together a solar energy system, like any other project, having the proper parts and tools for the job is paramount to overall success. With quality components and a little bit of know how, you can design and install your very own solar energy system whether for dedicated appliance use or as a complete replacement for conventional electric energy. Choosing the right parts is a big step in the process, and once you’ve decided which type of solar panels to use and how many you’ll need, the next logical step is to find appropriate batteries.

The most important step in choosing batteries for your solar energy system is making sure you purchase a bank with corresponding voltage to the panel array you’ve designed. The voltage of individual battery units on the market is 2; depending on how many individual battery units come in the bank, the voltage of the unit itself will be 2, 4, 6, 8, and so on. Once you’ve established the correct voltage for your battery bank, you can browse the available types and models to arrive at the perfect unit for your system. There are four basic kinds of battery banks widely available for purchase: marine models, and “industrial strength” varieties which include flooded, gel, and AGM features.

The marine models, commonly used on boats and small vehicles such as golf carts, tend to be the least inexpensive, and may be an option for small solar projects or those requiring solar powering for a limited period of time. In the long run, however, purchasing an industrial battery bank will save money. Flooded battery types are an economical option, with a moderate price and a reasonable longevity. These types release gas while charging, and so are not suitable for indoor use. Gel batteries, while a little more expensive, do not release gas allowing for indoor use, and come with a slightly longer life expectancy. Finally, AGM batteries may cost more, but have numerous benefits, including the longest longevity available, lack of gas or other leakage, and superior efficiency.

Taking care to select the battery bank that’s right for your solar system and its application is an important part of the overall design process, and, if done carefully, can lead to many years of nearly maintenance-free energy enjoyment. Shop with quality in mind and give yourself the gift of peace of mind for years to come.

Schottky Diodes – What makes them so special?

Some of the most common questions we get are about Schottky diodes.

Schottky Diode

The simple definition of a Schottky diode is a diode with a very fast switching action as well as a lower forward voltage drop.

As the current flows through a diode, it experiences a slight voltage drop across the diode terminals. Normally, a diode has approximately 0.7-1.7V drops. A Schottky diode, however, will see a drop in voltage between 0.15-0.45V. The benefit of this lower drop? A much higher system efficiency.

The construction of a Schottky diode also effects the voltage drop and switching time. A Schottky diode has a metal semiconductor junction as the Schottky barrier rather than the traditional semiconductor to semiconductor junction seen in conventional diodes. It is this barrier that affects the voltage drop and the speed of the switching times.

Sometimes Schottky diodes are misspelled by adding an ‘e’ to the end: Schottkey. The correct spelling is Schottky which is the surname of the man that is credited with putting these electronic components in the history books.

RGB Tricolor Flashing LEDS – Exciting New Product!

West Florida Components has just started to carry an exciting new product – RGB Tricolor Flashing LEDS!

At first glance you might think “Why are they calling them both RGB AND Tricolor?” The reason is that each LED is actually 3 separate LEDS housed in one case.

They operated in a sequence: first one color is lit at a time, then two light up, then all three. The cycle is completed when all three LEDS have been lit slowly, then begin to flash. Max voltage is around 3V.

We were trying to think of some interesting uses for these LEDS. Certainly they’ll be fun to use around the holidays – in garland or in wreaths or other holiday projects. How about as a centerpiece? They would also be great for costumes and for jewelry making.

Here’s a challenge for our customers:

Use your imagination and find a great project to use these in. We’ll feature the best suggestions/projects in a video on our home page!

A New Vacuum Tube Amp – Flash Quattro!

Steve from Canada has just sent us some pictures of his latest creation. This one is fantastic!

Here’s what Steve had to say about it….

Hello everyone, meet Flash-Quattro.  That means “four flashes”.  I
chose the name because the 807 tube is very art deco and it made me
think of the 1930’s series ‘Flash Gordon’,   and there are four of them
hence the name,- simple!

This is the latest version of the ‘Book-shelf’ amp series, like the
Caterpillar and Firecracker amps, this one is long and lean.

Now about the amp, it’s a push-pull 807 putting out 40 watts per channel or so,  in tetrode.  Rectification is with a 5R4, but you can choose to use 5U4
or 5Y3.  All supply the amp with more or less voltage and will change
the personality of the sound a bit.  I like the 5R4 so that’s why it’s
there.  Input tubes are a trio set of 6SN7GTB’s.

The output transformers are those nice Seeburg units that have Ultra-linear taps, but as I mentioned, I connected them in tetrode because I prefer the
sound of tetrode.  These outputs have impedance taps for 1,4,8,16 ohms.  A selector switch on the back of the amp allows you to switch
impedances ‘on-the-fly’ so you can choose and compare the taps you like
for what ever speakers you’re using at that time.  There is no problem
using the 4 ohm tap on an 8 ohm speaker, it how it sounds to you.

The power transformer is a Lowrey unit and a plate voltage of 373 vdc.
Classic green jewel light and side toggle On/Off switch.  Painted by my
good friend Joel Luttrell, and having his signature touch, a flawless
mirage of firecracker red (yes the same red as used in the
‘Fire-Cracker’ amp) and ice-pearl sparkles.  Apparently a fly decided
to do the back-stoke in the final coat of clear, so Joel had to pluck
out the fly, buff, and add more coats of clear.  Knowing Joel, there’s
probably 10 or more coats of clear here!
Take a look…..

vacuum tube amp


vacuum tube amp


vacuum tube amp


As always – thanks for sharing, Steve. We are amazed!

Opening Up and Tearing Down an IPOD Shuffle

Opening up and tearing down an IPOD Shuffle to see what’s inside…

The 3rd Generation of the IPOD Shuffle is a wonder of technology….1000 songs stored in an aluminum case smaller than a disposable lighter.

Did you ever wonder what electronic components make up the guts of an IPOD Shuffle?

You might be surprised at what goes into the circuitry of the IPOD Shuffle. In descending order by percentage of cost, the main components are:

logic, memory, metals, rechargeable materials, connectors, PCB, crystal, misc, capacitors, transistors, analog, diodes, magnetic, and plastics.

Here’s a partial breakdown by number of electronic components:

Capacitors – 65+
Resistors – 50+
Diodes – 4+

Pretty amazing what goes into equipment that measures only 45.2mm x 17.5mm x 7.8mm when fully assembled! This is possible because the components are extremely small surface mount components.

If you look at the cost breakdown by component family, it’s just as revealing. Naturally, the largest share is for memory in the form of IC’s. Over 70% (about $12.00 worth) is for logic and memory.

Available Methods of Marking Semiconductors

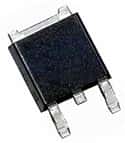
Semiconductor Markings – Available Methods

Traditionally, most components have two or three lines of identifying marks plus a company logo. Over time, the manufacturer codes have become more involved to incorporate a component’s identification plus the complete history of the process. Early on, it was the military applications that required very specific markings and identification processes. Current package markings are a by-product of those military requirements.

When a semiconductor is clearly identified, there is less room for error in the production process. Reducing errors when a component is in use for production saves time. There is also less product waste and the production process becomes more streamlined.

As the size of electronic components has decreased, the available space that manufacturers have to mark each piece has also decreased. The technology required to complete this task has become increasingly more complex.

The chief reason for the more complex codes stems from the demands of the end users. They need to have complete traceability of the product; from the history of the production cycle including the date and location of manufacture to the exact lot code. Possession of this information is critical to the end user in the event of a recall or defective components.

There are four primary methods to marking components in current use. Use of the various methods depend on the size, the type and the environment of the component production.

The methods are:
-Ink marking
-Electrolytic marking
-Pad printing
-Laser marking

In ink marking, inkjet printers are used. The technology is called ‘drop-on-demand’ which means that the flow of ink is controlled to create a pattern of ink droplets to form an image marking.

Electrolytic marking employs low voltage electric current with a stencil. The top layer of the package is etched by electricity flowing from the marking head, assisted by an electrolyte chemical. The process takes approximately 2-3 seconds to complete.

Pad printing is the most traditional of all the processes. A steel plate is etched with the image of the imprint. The ink is transferred to the plate which then is applied with pressure to the surface of the electronic component.

Laser marking is the most recent development in the marking process. It provides the greatest flexibility in the size, timing and complexity of the markings. The laser process is also the fastest method to mark electronic components; it is not uncommon for this process to print up to 300 characters per second. An additional benefit of using laser printing is the ability to produce a clean mark on many irregular surfaces.

No matter which method has been used to mark the semiconductors you use, you can be sure that much thought has been put into the decision.