Category Archives: Guides

What is a wind turbine?

A wind turbine is a rotary device that draws energy from the wind. This is different from a windmill, which draws energy from the wind but that energy is directly converted into mechanical energy used by some sort of machinery. Wind turbines are converted into raw electricity.

There are two main types, horizontal and vertical axis, of which the horizontal axis is more common. What are the differences between these two? Horizontal-axis turbines have the main rotor shaft and generator at the top of the tower. Horizontal axes must be pointed into the wind in order for them to work properly. However, the structure of the blades facing the wind also gives them a great angle of attack, which is the angle at which they have contact with the wind. This insures that the blades will be very efficient when converting wind to energy. Vertical-axis turbines are basically the same, except the axis is vertical, and they have the advantage of not having to face the wind.

Wind turbines are made up of three main components, the rotor component, generator component, and structural support component. The rotor component makes up about 20% of the cost, and consists of the blades. The generator component makes up 34% of the cost, and consists of the electrical generator, the control electronics, and usually a gearbox component for converting the low speed incoming rotation to high speed rotation which is better for generating electricity. Finally the structural support component makes up about 15% of the cost and consists of tower and rotor yaw mechanism.

Installing wind turbines can be a great way to save money on your electrical bills and create your own energy. They can be bought pretty inexpensively or you can even build your own and get the supplies to do it for even cheaper. If you are interested in building a basic wind turbine to see how it works, you should buy an educational wind turbine kit to get you started.

How to Make Your Own LEDS? Whooooooooa

I found this how-to today on the great Popular Science web site.

Now that I’ve read through the article – I am amazed that I’ve never seen these instructions written up before.

Theodore Gray, who authors their popular “Gray Matter” column, gives the full scoop on the basic materials used to construct LEDS and provides the basic instructions needed to see just how LEDS work.

OK, it is not so easy to find some synthetic silicon carbide (carborundum) laying around, but surely everyone could get their hands on some sandpaper, needles, a 9V battery and a snap. Follow his instructions, and VOILA…you’ve recreated the basic principles behind the creation of LEDS.

LED Basics: How to tell which lead is positive or negative

Here are more questions we get asked a lot:
What is the positive (or negative) lead on an LED? How do you determine the polarity of an LED?

If you are talking about through hole LEDS, in most cases it’s pretty easy to determine the polarity.

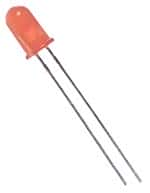
Through Hole LED

Through Hole LED

If the LED has two leads, one longer than the other,the longer lead is the postive (also known as the anode) lead.

If the LED has two leads with leads that are equal in length, you can look at the metal plate inside the LED. The smaller plate indicates the positive (anode) lead; the larger plate belongs to the negative (cathode) lead. Unfortunately, some jumbo LEDS have the plates reversed so this is not a fool-proof method.

If the LED has a flat area (on the plastic housing), the lead adjacent to the flat area is the negative (cathode) lead.

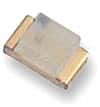
It’s a little bit harder to determine the polarity with Surface Mount LEDS. Some are marked with a (-) to indicate the negative lead, but often, they are not. The single best way to determine the polarity is through the use a multimeter.

Surface Mount LED

Surface Mount LED

Set the multimeter to the diode/continuity setting. Usually,the multimeter will supply enough current into the LED which will just barely light it up. The black (common) lead on the multimeter indicates the negative (cathode) lead, and the red indicates the positive or anode side.

Of course, if you can find the datasheet for your LED, the pinout, along with all the other specs will be readily available on the datasheet.

Connector Terms and Glossary

Are you a connector newbie? Below is a collection of terms relating to connectors with their corresponding definitions.

Attenuation – Decrease in power due to resistance or mismatch in transmission line.
Back Mounted – When applied to a coaxial connector it is that connector mounted from the rear of a panel with the fixing nut on the outside.
Bandwidth – Distance between two frequencies over which a RF or microwave device is intended to work.
Between Series Adaptor – An adaptor used to connect two different generic types of connector.
BNC – Bayonet Nut Connector.
Braid – A weave of metal strands used as an electrical shield for an insulated conductor or group of conductors.
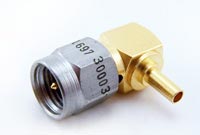
Connector

Connector


Bulkhead Mount – The type of connector fitted to a chassis using a single cut-out hole.
Cable Retention – The mechanism that joins the connector to the cable.
Cable Retention Force – The axial force which a connector / cable join can withstand.
Captive – A component such as a contact which is held firmly in position.
Characteristic Impedance – That impedance at which the transmission line is intended to work. A change from the characteristic impedance along its length will cause mismatch and loss of power.
Clamp – The holding of a cable by use of a screw thread action.
Closed Entry Contact – A female contact which is designed to prevent insertion of a contact larger than that specified.
Coaxial Cable – A transmission line where the one conductor is concentric inside another, often abbreviated to “coax”.
Coaxial Termination – A resistive element used to end a coaxial line in its characteristic impedance.
Coaxial Terminator – A device for terminating coaxial cable to a PCB or bulkhead mount (a mechanical device and should not be confused with coaxial termination)
Conhex – Tradename covering SMB and SMC, both in 50 Ohm and 75 Ohm impedance (discontinued)
Connector Durability – The number of times a connector can be physically mated and still maintain its specified performance.
Contact Resistance – The measurement of the DC electrical resistance between a pair of mated contacts. Usually specified as being measured after a given number of mating cycles.
Corona – A discharge of electricity caused by the ionisation of the air around a conductor just prior to total breakdown or flashover.
Crimp – The action of distorting a metal tube to give intimate contact with a conductor; a good crimp should be gas tight and not be impacted by environmental change.
Crimp Dies – The tool inserts which determine the shape of the distortion to create a consistently good crimp.
Crimp Tool – The tool which holds crimp dies to apply the necessary force.
Cross Talk – The amount of signal which may be transferred from one signal carrying line to an adjacent line.
Cut Off Frequency – The frequency at which the loss exceeds a predetermined level.
Decibel (dB) – A unit of measurement of RF power loss.
Dielectric – The insulating medium which holds the center conductor concentric within the connector or cable.
Dielectric Constant – The electrical value of dielectric which determines the impedance in cables or connectors with constant diameters.
Dielectric Withstanding Voltage – The maximum voltage that a dielectric material can withstand without failure.
Direct Solder – A common method of terminating connectors to semi-rigid cable by soldering the cable jacket to the connector.
Discontinuity – A dramatic change in characteristic impedance which gives rise to a reflected wave.
Dissipation – The unused or lost energy in a system e.g. heat.
Distortion – An unwanted change in a signal wave form.
Dummy Load – A device connected to the end of a transmission line to absorb transmitted power and prevent reflected energy.
Dust Cap – A mechanical device attached to the mating face of an unmated connector to prevent ingress of contaminants and provide protection against mechanical damage.
Electromagnetic Compatibility (EMC) – The ability of a device to operate within its intended environment without being effected by or generating electromagnetic interference (EMI).
Engagement and Separation Forces – The forces required to mate and unmate a pair of connectors. The forces are usually specified as a max & min for each action.
Environmentally Sealed – A connector that is provided with seals or other devices to prevent ingress of dust, moisture or other contaminants while mated which might impair performance.
Flexible Cable – A coaxial cable where the outer conductor is flexible (usually braided).
Gigahertz (GHz) – A measure of frequency representing 1 billion Hertz (cycles per second).
Impedance – See ‘Characteristic Impedance’
In-Series Adaptor – An adaptor which enables the connection of two connectors of the same generic type.
Insertion Loss – The loss of power due to a particular component in a transmission line (e.g. cable).
Insulation Resistance – The electrical resistance between two conductors separated by an insulating medium.
Intermodulation – The mixing of two or more frequencies which are not intended to mix.
Interface – The two surfaces of a connector which come into intimate contact when the two halves are mated.
Inter-series Adaptor – See ‘Between Series Adaptor’
Isolation – The measure of interaction between two or more transmission lines.
Jack – One half of a mating pair of connectors. The jack interface normally goes inside the plug interface.
Mean Power – The mean value of the rate at which energy is transmitted from one place to another.
Micro Strip – A transmission line consisting of a flat conductor on a dielectric above a single ground plane. (the ground plane is frequently a metalized face of the dielectric).
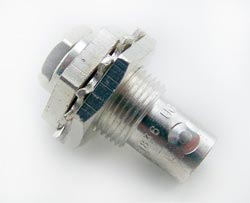
UG909B/U Female Bulkhead Clamp Kings Connector

UG909B/U Female Bulkhead Clamp Kings Connector

Microwave – Very short electromagnetic waves. Frequency range above 1 GHz.
MIL-C-39012 – The generic specification covering USA Military coaxial connectors.
MIL-C-17 – The generic MIL spec covering coaxial cables.
Mismatch – The condition in which the impedance of the source and load are not the = same. This reduces power transfer and causes reflections.
Mounting Plan – The design of the PCB or panel cut-out used to mount the connector. N Connector – This was the first true microwave connector capable of working to 18GHz, initially designed for test applications.
Nanohex – Trade name covering SSMB & SSMC (discontinued)
Noise – An external electromagnetic signal which interferes with the desired signal.
Non-captive – A component such as a contact which does not have a retention feature.
Passivation – This is a surface treatment applied primarily to stainless steel. The process removes contaminating iron particles and produces a passive surface.
Peak Power – Is the maximum power which may be handled by a connector or cable.
Plug – One half of a mating pair of connectors. The plug interface normally goes outside the jack interface.
POSNS – Abbreviation for “positions”.
PTFE – Abbreviation of polytetrafluorethylene. This is the most commonly used dielectric (insulator) used in professional coaxial connectors.
QPL – Qualified Parts List. Parts approved to MIL-C-390 12 specification.
Receptacle – A term used to describe a connector assembly usually bulkhead or PCB mounted.
Return Loss – A reason for loosing RF energy due to signals being reflected due to a mismatch in a transmission line.
RF Leakage – The RF power lost from a transmission line or device. Measured in dB.
RG – The traditional prefix for MIL spec coaxial cables.
Screw-on – The mating action of connectors which are joined using a screw thread (e.g. SMC)
Sealflex2â„¢ – Cannon trade name for a flexible microwave cable assembly which has a performance similar to semi-rigid cable.
Semi-rigid Cable – A coaxial cable where the outer conductor is a solid metal tube.
Skin Effect – The tendency of alternating currents to flow near to the surface of a conductor; this increases resistance and becomes more marked the higher the frequency.
SMD – Sometimes used as an abbreviation for slide-on variants of SMB. This is a misnomer, the more common use is for Surface Mount Device.
Snap-on – A term used to describe the mating action of SMB and SSMB connectors.
Solderless SMA – An SMA connector that can be connected to semi-rigid cable by compressing the inner body rather than by soldering (sometimes referred to as semi-rigid ‘crimp’ connectors).
Stripline – A method of building a microwave circuit. The circuitry is sandwiched between 2 ground planes. Sometimes referred to as Tri-plate.
Teflonâ„¢ – DuPont tradename for PTFE.
Tensile Strength – The greatest force a device can withstand without tearing or pulling apart. This is frequently the method of determining the effectiveness of a crimp.
TNC – Thread Nut Connector same size as BNC; the only obvious difference is the coupling nut.
Tri-plate – See Stripline.
UG Symbol – Used to indicate a connector made to US government spec.
Voltage Standing Wave Ratio (VSWR) – A way of expressing the resultant loss of power as a result of signal reflections due to discontinuity.
Round, Cylindrical or Hemispherical: Rubber Feet Dilemma Solved

You need some rubber feet but don’t know what shape to buy? Look no further. Here is the information you need.

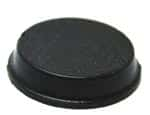
Do you want the top of the self-adhesive rubber feet to have a flat surface? You should choose a cylindrical rubber foot. Cylindrical rubber feet are basically shaped like a coin….flat top, and flat bottom.

They are perfect for situations where you need to use them between two flat surfaces. Some suggested uses are for the back of pictures and art hung on the wall; for kitchen and bathroom cabinets to cushion the close; and craft projects like coasters and stained glass projects. We’ve even seen them used to place sheets of glass on tabletops to separate the glass from the surface underneath. Cylindrical rubber feet are available in both clear and black.

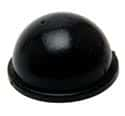
Do you want the self-adhesive rubber bumpers to be rounded? Then you need to purchase hemispherical rubber feet. Think of a ball cut into half – rounded on one side; flat where the adhesive attaches to the surface.

Hemispherical rubber feet are perfect for separating electronics equipment to help air circulate between two boxes. They are also ideal for applying to surfaces when you need a little bit of a grip on the surface underneath.

Here’s a unusual use for a hemispherical rubber foot: Apply with the adhesive side down on a bookshelf or display cabinet to hold propped up items in place. Clear rubber feet work perfectly on glass shelves! Like cylindrical feet, hemispherical rubber bumpers are available in clear or black.

Rubber Feet – How to Apply Self-Adhesive Rubber Bumpers

Many customers have asked about the best way to apply self-adhesive rubber feet to surfaces so that they are properly applied…and stay on the intended surfaces.

Here are the recommended application instructions:

    • Clean the surface where you will be applying the rubber feet. It should be dry and free of debris, oils and solvents. In addition, the ideal surface for rubber feet application is smooth and non-porous. You can use a mild solvent such as isopropyl alcohol to remove dirt or grease.
    • Grasp the rubber bumper on the sides without touching the adhesive.
    • Press the rubber bumper firmly into place on the application surface. The rubber foot can not be repositioned without effecting the adhesive.
    • For best results, allow 24 hours before exposing the rubber feet to heavy force or weight. This allows the adhesive on the rubber feet enough time to ‘cure’.

Besides following the above instructions when applying the rubber feet, it is important to keep the rubber feet (both storage and use) at a temperature that is between 70° – 80°F (21° – 27°C).


Choosing Batteries for a Solar Energy System

When putting together a solar energy system, like any other project, having the proper parts and tools for the job is paramount to overall success. With quality components and a little bit of know how, you can design and install your very own solar energy system whether for dedicated appliance use or as a complete replacement for conventional electric energy. Choosing the right parts is a big step in the process, and once you’ve decided which type of solar panels to use and how many you’ll need, the next logical step is to find appropriate batteries.

The most important step in choosing batteries for your solar energy system is making sure you purchase a bank with corresponding voltage to the panel array you’ve designed. The voltage of individual battery units on the market is 2; depending on how many individual battery units come in the bank, the voltage of the unit itself will be 2, 4, 6, 8, and so on. Once you’ve established the correct voltage for your battery bank, you can browse the available types and models to arrive at the perfect unit for your system. There are four basic kinds of battery banks widely available for purchase: marine models, and “industrial strength” varieties which include flooded, gel, and AGM features.

The marine models, commonly used on boats and small vehicles such as golf carts, tend to be the least inexpensive, and may be an option for small solar projects or those requiring solar powering for a limited period of time. In the long run, however, purchasing an industrial battery bank will save money. Flooded battery types are an economical option, with a moderate price and a reasonable longevity. These types release gas while charging, and so are not suitable for indoor use. Gel batteries, while a little more expensive, do not release gas allowing for indoor use, and come with a slightly longer life expectancy. Finally, AGM batteries may cost more, but have numerous benefits, including the longest longevity available, lack of gas or other leakage, and superior efficiency.

Taking care to select the battery bank that’s right for your solar system and its application is an important part of the overall design process, and, if done carefully, can lead to many years of nearly maintenance-free energy enjoyment. Shop with quality in mind and give yourself the gift of peace of mind for years to come.

Opening Up and Tearing Down an IPOD Shuffle

Opening up and tearing down an IPOD Shuffle to see what’s inside…

The 3rd Generation of the IPOD Shuffle is a wonder of technology….1000 songs stored in an aluminum case smaller than a disposable lighter.

Did you ever wonder what electronic components make up the guts of an IPOD Shuffle?

You might be surprised at what goes into the circuitry of the IPOD Shuffle. In descending order by percentage of cost, the main components are:

logic, memory, metals, rechargeable materials, connectors, PCB, crystal, misc, capacitors, transistors, analog, diodes, magnetic, and plastics.

Here’s a partial breakdown by number of electronic components:

Capacitors – 65+
Resistors – 50+
Diodes – 4+

Pretty amazing what goes into equipment that measures only 45.2mm x 17.5mm x 7.8mm when fully assembled! This is possible because the components are extremely small surface mount components.

If you look at the cost breakdown by component family, it’s just as revealing. Naturally, the largest share is for memory in the form of IC’s. Over 70% (about $12.00 worth) is for logic and memory.

Available Methods of Marking Semiconductors

Semiconductor Markings – Available Methods

Traditionally, most components have two or three lines of identifying marks plus a company logo. Over time, the manufacturer codes have become more involved to incorporate a component’s identification plus the complete history of the process. Early on, it was the military applications that required very specific markings and identification processes. Current package markings are a by-product of those military requirements.

When a semiconductor is clearly identified, there is less room for error in the production process. Reducing errors when a component is in use for production saves time. There is also less product waste and the production process becomes more streamlined.

As the size of electronic components has decreased, the available space that manufacturers have to mark each piece has also decreased. The technology required to complete this task has become increasingly more complex.

The chief reason for the more complex codes stems from the demands of the end users. They need to have complete traceability of the product; from the history of the production cycle including the date and location of manufacture to the exact lot code. Possession of this information is critical to the end user in the event of a recall or defective components.

There are four primary methods to marking components in current use. Use of the various methods depend on the size, the type and the environment of the component production.

The methods are:
-Ink marking
-Electrolytic marking
-Pad printing
-Laser marking

In ink marking, inkjet printers are used. The technology is called ‘drop-on-demand’ which means that the flow of ink is controlled to create a pattern of ink droplets to form an image marking.

Electrolytic marking employs low voltage electric current with a stencil. The top layer of the package is etched by electricity flowing from the marking head, assisted by an electrolyte chemical. The process takes approximately 2-3 seconds to complete.

Pad printing is the most traditional of all the processes. A steel plate is etched with the image of the imprint. The ink is transferred to the plate which then is applied with pressure to the surface of the electronic component.

Laser marking is the most recent development in the marking process. It provides the greatest flexibility in the size, timing and complexity of the markings. The laser process is also the fastest method to mark electronic components; it is not uncommon for this process to print up to 300 characters per second. An additional benefit of using laser printing is the ability to produce a clean mark on many irregular surfaces.

No matter which method has been used to mark the semiconductors you use, you can be sure that much thought has been put into the decision.

How To Clean Potentiometers On Your Audio Equipment

How to Clean the Potentiometers on Your Audio Equipment

If you have a dirty potentiometer, you probably will find out about it from the scratchy sounds your equipment will make when you adjust the volume control.

Here’s a simple and safe method to rid yourself of that noise:

-Unplug your equipment
-Remove the cover from the knob
-Carefully use contact spray on the shaft of the potentiometer
-Replace the knob
-Plug your equipment back in and turn it on
-Rotate the knob from one end of the range to the other.

Did that work? It should have – but if you still hear the scratchy noise, you can move onto this step:

-After unplugging the equipment again, remove the potentiometer from the housing and use the contact spray at the base. Before you put it back into the housing, rotate the shaft to be sure that it’s moving cleanly.

If you still hear noise, it might be time to replace the potentiometer. Before you cut the wires, it is recommended that you snap a couple of pictures of the previous installation including all wires leading to the potentiometer. This will assist you greatly when it’s time to connect the new pot.

Once you obtain the correct pot to install, you will need to use solder and a soldering gun to reconnect the wire leads from the potentiometer to the equipment.

Hopefully it won’t be necessary to replace the potentiometer. Most often, a spray is all it takes to rid yourself of the noisy potentiometer.