Monthly Archives: April 2015

Wireless sensors sans batteries

The Internet of Things has led to several simple sensors being used for applications requiring reporting of their readings wirelessly to a gateway or hub. However, most sensors require to be powered from batteries, creating logistical and cost barriers to several use cases. Now, many wireless sensor modules appearing on the market do not require batteries, as they are ultra-low power types.

Several key building blocks are necessary to make up a wireless sensor module meant for IoT use. The first among these is the sensor itself, its signal feeding a micro-controller that processes and packages it for transmission. The final part consists of a radio transceiver to send the information to its destination. Even with the most careful logic design, these building blocks work at a minimum of 1.8V, using up several tens of microamperes at modes requiring the lowest power.

However, in the last decade, extensive research has resulted in development of sub-threshold circuits involving logic, memory and RF. Transistor switching, in conventional logic design, takes place between saturation and an on-off state, dominated by leakage currents. Switching mostly occurs at a gate-to-source voltage or VGS of about 0.5V, which is the threshold voltage or VT for the transistor. In conventional logic, VGS < VT, is the condition for the transistor to remain in the off state. Sub-threshold circuits use this off-state region for the two operational states of a transistor. With the transistor's gate voltage operating below the threshold, the supply voltage can go lower than the conventional 1.8V. An active logic circuit consumes power relative to the square of the supply voltage. Therefore, operating at lower supply voltages can mean considerable power savings. The drawback in this manner of operation is that switching speeds slow down – but that does not hamper many applications. Another requirement of sub-threshold circuits is that a careful control is to be exercised on device physics, including circuit structures. These are necessary to mitigate the effects of temperature variation and noise. However, researchers have provided answers for these problems as well and the solutions have proven themselves practically. Functioning circuits are available for analog, microprocessors and memory devices. Sub-threshold designs are now starting to appear in the market as full SOCs. Universities of Michigan, Virginia and Washington have culminated their research efforts as a two-year old startup, PsiKick. They are preparing a sub-threshold circuitry based wireless sensor module that will operate without batteries. Aside from the RF transceiver, a micro-controller and a sensor front-end, the module will include blocks for energy harvesting. This makes it a self-powered sensor platform that can be used in a wide array of applications. Another design, a second-generation version, is on the cards. This is based on standard CMOS technology and a demonstrable product is due any time soon. The sub-threshold module requires astonishingly small power to operate. Compared to sensor platforms currently available, these modules will consume 100 to 1000 times less power. When fully operating, the micro-controller consumes only 400nW while the RF transmitter generated 10µW, which is effective within a 10m range. The module operates within a supply voltage range of 0.25 to 1.2V. That makes the module eminently suitable to the output capabilities of most energy harvesting methods.

RemotePi: An Intelligent Infrared Remote Controlled Power Switch for the Raspberry Pi

When you have built a mediacenter system using the tiny single board computer, the Raspberry Pi or the RBPi, there is usually a hand-held infrared remote to manipulate the various controls. However, using the remote to switch off/on the mediacenter system does not switch the RBPi. Adding a RemotePi board lets you switch on/off the power of the RBPi safely with the remote or a push button.
There are two versions of the RemotePi board – one that fits the RBPi Models A+ or B+, and another that fits RBPi Models A or B. Although electrically similar, RBPi Models A+/B+ are different from Models A/B – the mounting holes and connectors are differently placed. Therefore, you must select the RemotePi board to fit your current RBPi model.

Additionally, the RemotePi board comes in two variants. The first has the IR receiver and LED integrated on it, while the second variant sports an external IR receiver and LED connected by a cable. The second variant is useful when you want to mount the RBPi and RemotePi out of sight, leaving only the IR receiver and LED visible for the users.

The RemotePi works by re-routing the power to the RBPi, instead of feeding it directly. On the board, a micro-controller manages the power line to the RBPi. Depending on the command received from the push button on the board or the infrared remote control, the micro-controller switches power on or off for the RBPi.

However, when switching off the power to the RBPi, RemotePi does not cut off the power immediately. Instead, it sends a notification to the RBPi via a signal on its GPIO port. The RBPi monitors this signal on the GPIO port continuously via a script running in the background. Once triggered, the script initiates a clean shutdown of the OS and thereby, prevents data corruption. Once the shutdown is successful, RemotePi then proceeds to cut off the power completely to the RBPi.

When the RemotePi has to switch power to the RBPi from an infrared remote control, you must teach the unit to recognize the type and button preferred. For this, you let the RemotePi enter a learning mode and then point your remote control towards the infrared receiver on the board. Now press the preferred button on the remote you would like to use in future to control power to the RBPi and the RemotePi will remember the button. For using a different remote or button, simply repeat the process.

Another feature of the RemotePi is that you can teach it to use one button to power off the RBPi and use another to switch the power back on. Apart from controlling power, the RemotePi board will forward any received infrared signal to the RBPi. Therefore, you can use the remote control for the mediacenter as well as use LIRC for the RBPi.

RemotePi prevents data corruption on the RBPi with sudden power outages. Additionally, you can reboot the RBPi to clear memory leaks or for automatic updates. It does not occupy a USB port and is totally compatible with the simple GPIO IR receiver.

Control your computers from anywhere with the Raspberry Pi

If you are one of those who often need to use the home computer from a remote location, then you need a Web-based application that can power your home computers up or down. For example, you may have a specific file or folder on your home computer that you urgently want to access but cannot do so because you are in a different location.

Keeping the home computer always powered on is not a great idea, even though it allows remote connections when required. For one, an always-on computer consumes power unnecessarily. Additionally, if there is a crash, there is no way you can get it up running again from your remote location. This is exactly what Martin Peters faced when he devised a hardware-based solution to cut the power down to his home computer and put it back up again when necessary.

What Martin realized that he had to have at least one computer always on and connected to the internet, to be able to control the others from a remote location. He hit upon the cheapest and lowest power consumption computer – the Raspberry Pi or the RBPi. Additionally, this tiny single board computer comes with an Ethernet port and some General Purpose Input Output or GPIO. The Ethernet port allows the RBPi to connect to the Internet and the GPIO allows controlling additional electronic circuitry.

Martin used the GPIO on the RBPi to control electronic circuitry on a circuit board he has custom made, see details here. This allows him to cut the power to his home computer, press its power switch and read the state of its power LED. For doing this, he has designed a web-based user-interface with which he wraps those GPIOs. The user-interface updates in real time and displays logs along with the power LED status.

The C++ widget-oriented web toolkit used by Martin is called Wt. The toolkit handles updates with a very simple method and even provides a native library called wiringPi to handle the GPIOs of the RBPi.

The GPIOs on the RBPi are very sensitive and can easily be damaged if more than 3mA is drawn from them when in output mode. The best solution Martin found was to isolate those using opto-isolators. Since Martin wanted to control many computers from the RBPi, he decided to place all the opto-isolators close to the RBPi and all the switching on the PC side. That meant each PC was to have a PCB and all the circuits could be connected with an Ethernet cable.

Keeping a relay to cut the power to the computer would require an additional 12V power supply to operate the relay. Instead, Martin accessed the green wire on the secondary side of the ATX power supply unit. When the computer’s motherboard wants to wake up, it shorts the green wire to the ground, which signals the ATX PSU to start supplying voltage to its other pins and the entire computer boots up.

Martin used a MOSFET in series with the green wire. He tied the gate pin of the MOSFET to the +5V (violet wire) of the ATX PSU via a 10K resistor. Pulling the gate to ground using an opto-isolator gave Martin complete control of the ATX PSU.

Add Bluetooth to any speaker

using bluetooth on any speakerMany of us have old unused powered speakers stashed away somewhere. Even if they were to be used, long snaking wires would have to be laid, depending on how far away they were to be placed from the amplifier. In this era of Bluetooth, we are spoiled by the ease with which we can connect – without wires. In fact, Bluetooth allows us to connect not only two phones, but also computers, mice, keyboards, tablets, headphones, fitness trackers and so many more gadgets. However, Bluetooth audio remains the most popular application among all the above.

Bluetooth audio allows you to pair a speaker or speakers with any device, such as a phone, computer, tablet or any other, so that you have an audio connection – sans wires. Different types of Bluetooth speakers are available in the market. However, good Bluetooth speakers are quite expensive. The only advantage with these wireless Bluetooth speakers is that they will not be tethered by wires – their performance however, is not going to improve.

Therefore, if you have old speakers that still perform very well, upgrading them to work without wires will be worth the small amount of expenditure required to add Bluetooth to them. Once installed, the Bluetooth receivers in your speakers will pair with any Bluetooth enabled device. This will enable you to stream any audio from anywhere to your speakers.

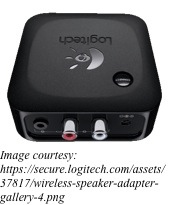
Depending on your needs, shop for the right type of Bluetooth receivers from sites such as Amazon, eBay and others. Some have optical audio connection, while others come with RCA plugs for the left and right channels. Almost all will have an LED that lights up when the unit is paired to a device. The units run on 5V, so a USB power supply will do, while output is taken through a 3.5mm stereo jack.

Setup is simple – connect the Bluetooth receiver’s audio out to the audio cable of your speaker, or to its auxiliary input, if the speaker has them. Next, power up the unit and now all that is left is to pair the unit with a Bluetooth device.

As soon as you plug in the power to the receiver, it will start broadcasting its identifier. Open the Bluetooth settings on the device you prefer and connect. If you have a low-end device, only one pair can remain connected at a time. To switch sources, you will have to disconnect the current pair first before pairing another. Some high-end devices can store up to eight different audio sources, allowing easy switching.

The sound quality of an audio system depends primarily on the quality of the source and then on the quality of the amplifier and speaker combination. Addition of the Bluetooth receiver in this chain does not detract much from the listening pleasure. In fact, you will hardly notice any difference between Bluetooth streaming audio wirelessly and speakers connected directly with wires. The advantage with Bluetooth connection is that you can place your speakers more than 30ft away from the source.

Therefore, if you have a pair of powered speakers lying around unused, you can upgrade them with Bluetooth. You will be surprised at how much better they sound compared to the tinny sound from your mobile.

Versatile Chip to Convert Temperature to Bits Directly

LTC2983One of the most fundamental aspects of our lives is temperature. As yet, measuring temperature accurately is difficult. Galileo was possibly the first person to have invented a thermometer that could measure changes in temperature. Two hundred years after Galileo, Seebeck discovered the principle of thermocouples – a device that generates a tiny voltage related to temperature gradients in dissimilar metals. Today, we use many elements such as semiconductor elements and temperature dependent resistive elements for measuring temperature electrically.
Most temperature measuring elements are analog devices. Digitization of these analog devices leads to measurement of temperature with greater accuracy and precision. So far, this was achievable only with expertise in analog and digital circuit design. However, a versatile chip is now available that helps to convert temperature directly to the required digital bits.

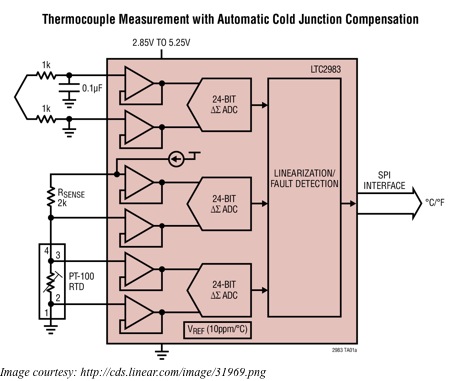
The LTC2983 carries within itself all the analog circuitry that different sensors need. It also has the necessary temperature measurement algorithms and data for linearization so that each sensor can measure temperature directly and the LTC2983 can output the results in degrees Centigrade. The IC makes it easy to handle all the challenges unique to diodes, thermistors, RTDs and thermocouples.

For example, a thermocouple will generate a voltage when there is a temperature difference between its tip and its cold junction – the tip touches the surface whose temperature is to be measured, while the cold junction is on the circuit board. Now, for an accurate measurement of the thermocouple temperature, you also require an accurate measurement of the temperature of the cold junction. A separate non-thermocouple temperature sensor, placed at the cold junction, usually does that.

With the LTC2983, you can connect diodes, RTDs or thermistors to measure the cold junction temperature. To convert the voltage output from the thermocouple into temperature, one has to solve a 14th order polynomial equation for both the voltage from the tip as well as from the cold junction. The advantage with the LTC2983 is that it has the required polynomials built into it for all the eight standard types of thermocouples – J, K, N, T, R, S and B – used in the industry. Therefore, not only does the LTC2983 measure the thermocouple output and the cold junction temperature, it also performs all the required calculations for reporting the thermocouple temperature in degrees Centigrade.

Thermocouples usually generate less than 100mV at full-scale output. Voltages at such low levels require the Analog to Digital Converter to have very low offset and noise. Furthermore, the reference voltage needed for the absolute voltage reading requires good accuracy and low drift. The 24-bit ADC within the LTC2983 has all these qualities – its noise and offset is below 1µV, and its reference voltage has a maximum drift of 10ppm/°C.

If the tip of the thermocouple is exposed to temperatures below that of the cold junction, the voltage output goes below the ground level. This complicates matters, as the circuitry requires an additional negative supply or circuitry that can shift the input level. The LTC2983 handles all this with a single ground-referenced supply, as it incorporates a front-end that can digitize signals below ground. In addition, the LTC2983 has high input impedance, low input currents and is able to accommodate external protection resistors and filtering capacitors.